Showing posts with label Photography. Show all posts

Saturday, 21 March 2015

Photography - Printing + Task 4

In this lesson we learnt how to set up a file to be printed correctly.


One of the first things we did was  collaborate the computer so that the colours we alted on screen because of the lighting in the room making the printed image look different to the one on screen. we used a calibirater to do this which mesured the light in the room and adjusted the screen.

we then went to print proof the image in photoshop to see wether perceptual or relative calorimetric


here is some information i found out about these rendering types 


We then set up the settings to match the type of paper + printer we used as well is imputing some information  in a description about the settings we used  


to check the the print matched the image on screen i placed my immage under the moniter which the brghtness was set down to half to compare, this is because the light on the screen would effect how the image looked. 


Wednesday, 18 March 2015

Photography - Evaluation

This was defiantly my favourite out of the pro tool kit subjects.  The lessons were really helpful and i have learnt the correct work flow for professional photography and how things like colour space , raw files ETC effect the outcome of the image.  I think the lighting workshops were helpful not onlt for portait lighting but for film too as they cross over. I wish i took better more composed images in these tasks to show what i can do better  but i feel the images were adequate for the tasks.

Wednesday, 11 March 2015

Photography - Task 3


Aim - 

Produce three studio portraits, two using the chiaroscuro lighting techniques demonstrated in the workshop (i.e. one Rembrandt and one Caravaggio) and one in the lighting technique of your own choice. All 3 images must be captured in RAW format and mastered as a Smart Object in TIF or PSD file format as outlined in workshop one). Use the techniques demonstrated in the portrait workshop to consider the quality, quantity and direction of light in relation to the subjects pose and this influences the composition of the portrait (e.g. broad and narrow light direction, subject pose and space around the subject and camera and lens settings.)


I took all images for this  on manual . 1/60 100 iso  and changed the fstop depending on the light set up using a light meeter  i took them in both raw and jpeg  once edited i saved them as a tiff file. I dont know why i took them all in landscape i just preferred it to portrait, which was stupid because they are meant to be portraits, if i was to do it again id take them portrait.

I ended up doing 4 different types of lighting

Split lighting 

To take this image i put the light at 90 degres from nicks face on a high setting with a large soft box on it.  Nick was stood about 3ft away from the back ground to separte him and i was then stood about another 3 foot away from him

The purpose of this lighting is to add drama so i put him in a dramatic stance. 


Rembrant 


I lit this on the narrow side of nicks face so when they light went over his nose it would light up the broad side with a triangle. 

I put the light with a small soft box to the left of his face and fairly close, if i moved it further out it would have lit too much of the broad side of his face

The light was on about 2 and i took this one with nick sat in a chair with him tilted to the sdid then turning his body a little to look like that 


Carivagio 


I took this one similar to the rembrant how ever  i move the soft box further out so it lit up more of her face  but becuase it was on the narrow side of her face it kept the dark shaddow on the broad sid. 


rim light 


To take this image i place a brght light with a head reflector on behind kat and then used a really dull soft box on the front of her face so you could see her 


Tuesday, 10 March 2015

Photography- Studio Lighting

In this lesson we covered - 
  • the difference in broad and narrow lighting 
  • how to pose a model correctly 
  • rembrant and carivagio lighting 
  • hollywood lighting 

To get broad lighting you must position your model at an angle and shine the light on the broad side of there face . 


This is used for high key portraits and creates a softer shaddow on the person making there face look wide . 

Narrow lighting is where you do the same as broad... but put the light on the narrow side of there face. 


This gives more definded shaddows  giving a slimming look to the portrait. 


you can use these types of lighting to create different styles . 

for example 

rembrant - This ligthing is taken from the painter, rembrant who used lo light his portraits in a way that lit the broad side of there face and created a small triangle of light on the other. 


To create this you put a light with a soft box on one side of the face and position it so a but of light comes above there nose onto the check. 

carivagio - is also after a pinter  who used very strong contrast of shaddows and highlights to creat his paintings.   his work contained elemnts of chiaroscuro (   in art is the use of strong contrasts between light and dark, usually bold contrasts affecting a whole composition. It is also a technical term used by artists and art historians for the use of contrasts of light to achieve a sense of volume in modelling three-dimensional objects and figures.  and (Tenebrism)  It’s when a piece has a strong Chiaroscuro, with darkness being a prominent aspect, and usually with the subject emerging from it.


to do this you must position the model an angle and place the light closer to the model to give high contrast. 


hollywood -  this uses high key, narrow lighting and a soft box. to create the beautiful, glowing highlight on the subject’s hair and separate them from the dark background. Place the light slightly off to the side of the subject so that only the edge of the light from the softbox catches the subject’s face — feather it upwards and more to the left, away from your subject. It will also give an edge to the clothing further creating separation.


here are some images i took during this lesson 


Friday, 27 February 2015

Photography - Light room and Task 2

What is lightroom -  it is a program used to organise, store and develop  images.

What are the advantages of lightroom -

  • manage / organise photos easily 
  • non destructive work flow 
  • develop photos like camera raw in photo shop 
  • auto save + history to go back 
  • before and after views 
  • virtual copies 

I used light room for this task to organise all the photos i took during the studio shoot lighting task. 


I started by making a new light room catologue and importing my images in by using the add fuction, i used add as i allready had a copy of the negative files save to my harddive so only wanted to add them in.


becuase of this when i removed my hard drive  the files went off line  but as i had built smart previews when importing i could still veiw the images, if i click on the ! i could try and relocate them.  

another way files can be imported is from another catalogue, how ever i didn't have any in another catalogue so i didn't use it. 


I then went through and organised all images , i colour coded them depending on who was in the image , stared all the ones i like best and added key words. This organisation means that  when i want to try and find an image later on it will be a lot easier. I can do this by using the atribute or text function to find what i am looking for. 
I then made collections of the images that i thought were best then put them into categories depending who was in them. 

I then ognised these collections into a collection set. 


One i did that i went through and edited my images, lightroom has the same settings as camera raw in photo shop that can be used to edit images 


It auto saves these changes which you can go back through in the history, the history is also coppied if you make a new catalogue of the images. 


You can also send images to photo shop if you like as both programs are run by adobe 


and use before/after to see what the changes look like 


I then wanted to make some of the images black and white, so i made virtual copies of these , which allows me to change the image of the copy without effecting the first one. 


I only edited one of the coppies  then i selceted all the ones i wanted to be black and white  and synchronised them . 

 I then went into survey veiw to compare my images and select the ones i wanted to export.


I then added a water mark to the images  before exporting them 


I also exported one of the collections as a new catalogue 

The advantages of doing this means that it keeps light room more organised and tidy without having 10000 of files all over the place. 


Wednesday, 25 February 2015

Photography - Task 1

Assessment Task

 Capture 5 different images from environments with different light sources (e.g. studio lighting, electronic flash, tungsten (bulb), daylight, mixed light-sources, etc.) using the RAW format from a Digital SLR camera. Process, correct and adjust the images using the appropriate workflow in Adobe Photoshop CC.


When setting up my camera i put it in the following settings
- To take both Raw and Jpg
- Adobe RGB ( as thats the highest my camera would take in )
- tv ( no flash )  + Auto focus
- White balance was changed depending on location

As the aim of this task was about the white balance and editing in camera raw i didn't think it mattered that the camera was on auto or what the images were of.


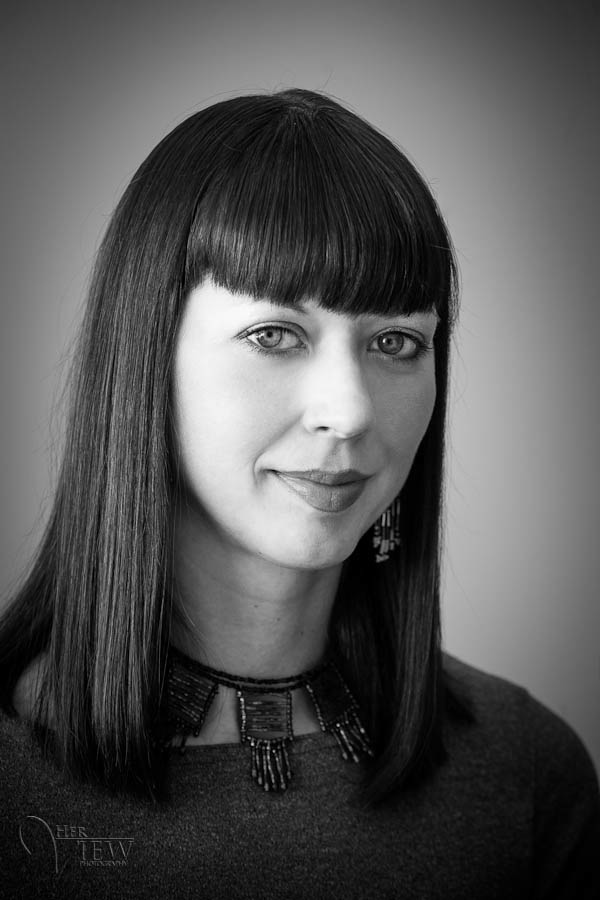
Here is the first of the 5 images i took in its un edited state

 Even though it was taken indoors as the room had a glass roof the lighting was actually day light  but it took the image in cloudy  which left it a bit orange.  I also over exposed the back ground. How ever both of these things can be fixed as it was taken in camera raw.

First off i change the white balance back to daylight

using the histogram i could tell that the image was over exposed as the left side was over exposed and when i clicked on the clipping it showed me the areas that were causing that 
how ever when i change the exposure this happend 

so i used the adjustment brush, this aloud me to select jus the back ground and change the levels on that with out effecting josh. I used the atuo mask around josh so the brush didnt get him too . 


i then openend this in photo shop as a smart object and saved it as a psd as this will allow me to go back in and see the layer and continue editing if needed. 

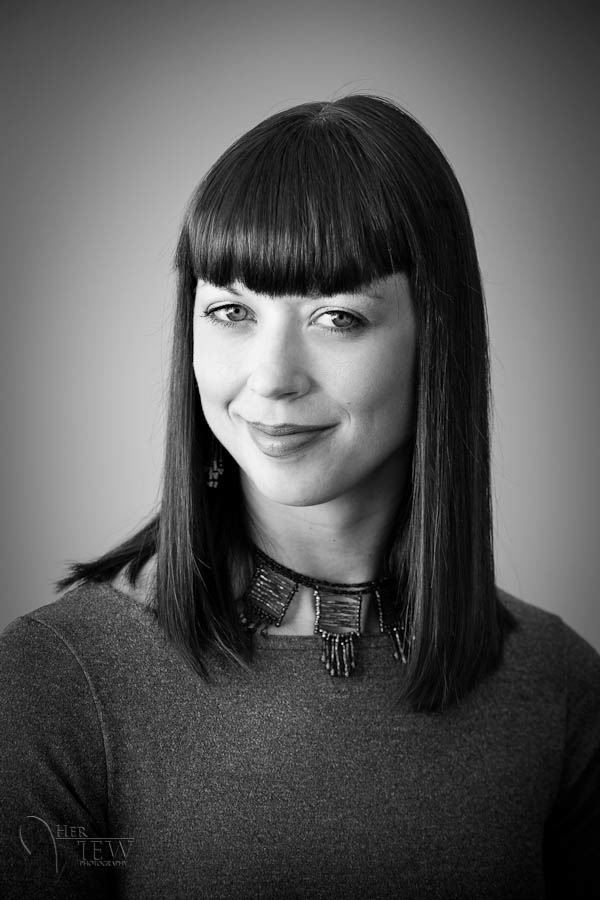
here is the finished version of the image 

The second image i took was set to cloudy when it was florescent and i also turned the iso down so it was dark  


i then turned the exposure and made it the correct white balance 

The histogram was still pretty high on the right side so i turned down the black and the shadows 

Here is the finished image, also saved a psd. 


the third image also had a low iso and was taken in cloudy.


I started by changing the exposure and highlights/ shadows and then used the white balance tool to select a grey point in the background  as i didnt think any of the white balance in the drop down menu looked right on the image. 

here is the final image that i saved as a psd 


the 4th image was on the same settings as before 


i then changed the exposure, highlights, shaddows. 
 i then masked out the sky to bring out some of the cloud but changing the settings 

I then changed the tint of the image as it was taken at sunset and the sky was a kind of pink colour 


I then tried to do the same with the jpeg version of the image how ever trying to brighten the train over exposed the sky as all the detail were retained like they are in a Raw file. 


here is the finished image that i again saved as a psd so it can be opened again. 


I might actually go back and change this a bit as the tree on the left looks too dark 

the 5th image was taken on florescent white balance 


so i got everything to look how it was suposed to how ever the sky was a little to over exposed and the statue was too dark. 


so i used a mask ont he sky to bring the exposure down and make it a bit blue 

i then used a mask on the stature to turn the shadows up 

and saved it as a psd